Nginx+ownCloud+PHP+MySQL搭建私有云
ownCloud是一个免费开源的软件,用于为分享文件,日历,联系人,书签和个人音频/视频,它拥有全客户端,方便使用,同时也非常容易安装和管理。

配置mysql
这里就不详细讲mysql的安装了,直接配置mysql。
# 创建数据库
CREATE DATABASE IF NOT EXISTS owncloud DEFAULT CHARACTER SET UTF8 COLLATE utf8_general_ci;

# 创建用户
GRANT ALL PRIVILEGES ON owncloud.* to 'owncloud'@'127.0.0.1' identified by 'owncloud';

# 刷新数据库
FLUSH PRIVILEGES;
获取ownCloud
# 获取最新的版本
wget https://download.owncloud.org/community/owncloud-10.0.2.zip

# 解压缩
unzip -oq owncloud-10.0.2.zip

# 放到合适的位置
mv owncloud/ /data/domains/cloud

# 如果使用的centos,关闭selinux
setenforce 0
配置nginx
由于我们是初次配置,可以不采用https
配置文件如下,注意修改相关路径
upstream php-handler {
    server 127.0.0.1:9000;
    #server unix:/var/run/php5-fpm.sock;
}


server {
    listen 80;
    server_name ***;# 这里自定义好


    # Add headers to serve security related headers
    # Before enabling Strict-Transport-Security headers please read into this topic first.
    #add_header Strict-Transport-Security "max-age=15552000; includeSubDomains";
    add_header X-Content-Type-Options nosniff;
    add_header X-Frame-Options "SAMEORIGIN";
    add_header X-XSS-Protection "1; mode=block";
    add_header X-Robots-Tag none;
    add_header X-Download-Options noopen;
    add_header X-Permitted-Cross-Domain-Policies none;

    # Path to the root of your installation
    root /data/domains/cloud;##这里需要修改

    location = /robots.txt {
        allow all;
        log_not_found off;
        access_log off;
    }

    # The following 2 rules are only needed for the user_webfinger app.
    # Uncomment it if you're planning to use this app.
    #rewrite ^/.well-known/host-meta /public.php?service=host-meta last;
    #rewrite ^/.well-known/host-meta.json /public.php?service=host-meta-json last;

    location = /.well-known/carddav {
        return 301 $scheme://$host/remote.php/dav;
    }
    location = /.well-known/caldav {
        return 301 $scheme://$host/remote.php/dav;
    }

    location ^~ /.well-known/acme-challenge { }

    # set max upload size
    client_max_body_size 512M;
    fastcgi_buffers 64 4K;

    # Disable gzip to avoid the removal of the ETag header
    gzip off;

    # Uncomment if your server is build with the ngx_pagespeed module
    # This module is currently not supported.
    #pagespeed off;

    error_page 403 /core/templates/403.php;
    error_page 404 /core/templates/404.php;

    location / {
        rewrite ^ /index.php$uri;
    }

    location ~ ^/(?:build|tests|config|lib|3rdparty|templates|data)/ {
        return 404;
    }
    location ~ ^/(?:\.|autotest|occ|issue|indie|db_|console) {
        return 404;
    }

    location ~ ^/(?:index|remote|public|cron|core/ajax/update|status|ocs/v[12]|updater/.+|ocs-provider/.+|core/templates/40[34])\.php(?:$|/) {
        fastcgi_split_path_info ^(.+\.php)(/.*)$;
        include fastcgi_params;
        fastcgi_param SCRIPT_FILENAME $document_root$fastcgi_script_name;
        fastcgi_param PATH_INFO $fastcgi_path_info;
        #fastcgi_param HTTPS on;
        fastcgi_param modHeadersAvailable true; #Avoid sending the security headers twice
        fastcgi_param front_controller_active true;
        fastcgi_pass php-handler;
        fastcgi_intercept_errors on;
        fastcgi_request_buffering off; #Available since NGINX 1.7.11
    }

    location ~ ^/(?:updater|ocs-provider)(?:$|/) {
        try_files $uri $uri/ =404;
        index index.php;
    }

    # Adding the cache control header for js and css files
    # Make sure it is BELOW the PHP block
    location ~* \.(?:css|js)$ {
        try_files $uri /index.php$uri$is_args$args;
        add_header Cache-Control "max-age=15778463";
        # Add headers to serve security related headers (It is intended to have those duplicated to the ones above)
        # Before enabling Strict-Transport-Security headers please read into this topic first.
        #add_header Strict-Transport-Security "max-age=15552000; includeSubDomains";
        add_header X-Content-Type-Options nosniff;
        add_header X-Frame-Options "SAMEORIGIN";
        add_header X-XSS-Protection "1; mode=block";
        add_header X-Robots-Tag none;
        add_header X-Download-Options noopen;
        add_header X-Permitted-Cross-Domain-Policies none;
        # Optional: Don't log access to assets
        access_log off;
    }

    location ~* \.(?:svg|gif|png|html|ttf|woff|ico|jpg|jpeg)$ {
        try_files $uri /index.php$uri$is_args$args;
        # Optional: Don't log access to other assets
        access_log off;
    }
}
检查一下你的nginx和php-fpm是以什么用户身份跑的,一般debian系列都是www-data,centos系列是nginx。
然后修改目录权限
chown -R www-data:www-data cloud/重启nginx
service nginx restart
OR
systemctl restart nginx
安装ownCloud

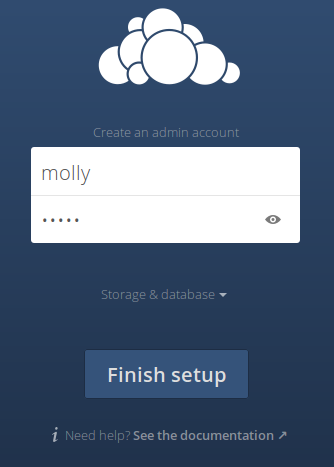
登陆之前nginx上配置的域名,自己的云的主页将出现。你将被要求创建一个新的管理员账户。输入管理员账户信息。

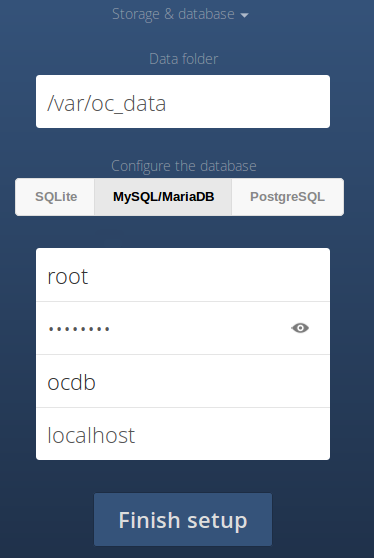
然后点击 Advanced 下拉按钮,选择mysql并输入mysql数据库名,数据库用户和密码。最后点击 Finish setup 来完成安装。
就是这样。我们的云服务已经准备好了。现在,你可以从你任何网络的客户端来上传/下载你的图片,文件,音频,视频以及访问它们。
常见问题
- 没有权限读写配置文件,关闭selinux
# setenforce 0 - 获取不到环境变量,修改
/etc/php-fpm.d/www.conf
# 开启这里
env[PATH] = /usr/local/bin:/usr/bin:/bin

# 重启php-fpm
service restart php-fpm
这博客也太简单了点吧。各个地方都说的不清不楚
咨询一下大佬呢,好不容易搭建起来了,own cloud里面管理用户,提示创建用户出错: 必须提供合法的用户名 数字字母都不行
哦,找到原因了,貌似必须填写邮件地址。。哈哈
有意思,,用户组为空的话,刷新页面会自动删除这个组,但是创建的用户默认密码也没有告诉是多少哎。。。
大佬,有没有可以在win平台搭建的云盘推荐推荐~
nextcloud就挺好的,如果还想更简单,可以使用filebrowser。
你好博主:
我owncloud X已经被卡了一个星期了,数据库选择sql创建就会报错。
一、我的nas环境是威联通Qnap453Dmini,已经启用威联通自带的web服务器和SQL服务器,登录phpmyadmin信息如下(PHP扩展也安装):
1、web服务器信息
Apache
数据库客户端版本: libmysql - mysqlnd 5.0.12-dev - 20150407 - $Id: 7cc7cc96e675f6d72e5cf0f267f48e167c2abb23 $
PHP 扩展: mysqli文档 curl文档 mbstring文档
PHP 版本: 7.3.7
2、数据库服务器
服务器: Localhost via UNIX socket
服务器类型: MariaDB
服务器连接: SSL未被使用 文档
服务器版本: 5.5.57-MariaDB - MariaDB Server
协议版本: 10
用户: root@localhost
服务器字符集: cp1252 West European (latin1)
二、操作步骤
1、已经在数据库创建命名owncloud的数据库
2、已经创建用户owncloud并赋予权限
三、报错信息
打开owncloud首页,创建管理员、密码,配置数据库选择第二个mysql/mariaDB
数据库用户名:root
数据密码:这里填的root密码
数据库名:owdb(自编)
数据库主机:localhost
提示错误:
Error while trying to create admin user:Failed to connect to the database:An exception occured in driver:SQLSTATE[HY000][2002] No such file or directory
搜一下关键字An exception occured in driver:SQLSTATE[HY000][2002] No such file or directory。我搜索的结果是找不到mysql.sock文件,你看看为什么php连接数据库要找mysql.sock文件,讲道理用端口连接就行。