Nginx+DokuWiki+PHP搭建自己的维基百科
Wiki系统属于一种人类知识网格系统,可以在Web的基础上对Wiki文本进行浏览、创建、更改,而且创建、更改、发布的代价远比HTML文本小;同时Wiki系统还支持面向社群的协作式写作,为协作式写作提供必要帮助;与其它超文本系统相比,Wiki有使用方便及开放的特点,所以Wiki系统可以帮助我们在一个社群内共享某领域的知识。
DokuWiki介绍

DokuWiki是一个开源wiki引擎程序,运行于PHP环境下。DokuWiki程序小巧而功能强大、灵活,适合中小团队和个人网站知识库的管理。DokuWiki不需要数据库,直接采用文本文件直接存储。
系统要求
安装了Nginx和PHP,php版本在5以上。php插件包括php-mbstring,php-gd。
DokuWiki安装
从DokuWiki官网下载适合中文环境的安装包:下载地址
这里,我们把安装包放到linux路径/data下。然后解压
tar -zxvf dokuwiki-7f2a0e427ff9bc5078571f8c643f2c33.tgz -C /data
接着,我们需要查看nginx的运行环境。

可以看到是以nginx用户来运行的,所以需要把wiki文件的所有权改为nginx。
chown -R nginx:nginx /data/dokuwiki
Nginx配置
需要一个nginx的配置文件来专门解析dokuwiki。
一般都会在/etc/nginx/conf.d目录下。我们创建一个名为dokuwiki.conf的配置文件到/etc/nginx/conf.d.
内容如下:
server {
    listen 80;
    server_name wiki.example.com;## 这里需要修改成自己的域名
    # Maximum file upload size is 4MB - change accordingly if needed
    client_max_body_size 4M;
    client_body_buffer_size 128k;

    root /data/dokuwiki;## 这里填真正的wiki目录
    index doku.php;

    #Remember to comment the below out when you're installing, and uncomment it when done.
    location ~ /(data/|conf/|bin/|inc/) { deny all; }

#   Uncomment this prevents images being displayed !
#    location ~* \.(js|css|png|jpg|jpeg|gif|ico)$ {
#        expires 31536000s;
#        add_header Pragma "public";
#        add_header Cache-Control "max-age=31536000, public, must-revalidate, proxy-revalidate";
#        log_not_found off;
#    }

    location / { try_files $uri $uri/ @dokuwiki; }

    location @dokuwiki {
        # rewrites for userewrite=1
        rewrite ^/_media/(.*) /lib/exe/fetch.php?media=$1 last;
        rewrite ^/_detail/(.*) /lib/exe/detail.php?media=$1 last;
        rewrite ^/_export/([^/]+)/(.*) /doku.php?do=export_$1&id=$2 last;
        rewrite ^/(.*) /doku.php?id=$1&$args last;
    }

    location ~ \.php$ {
        #try_files $uri $uri/ /doku.php;
        fastcgi_pass   127.0.0.1:9000;
        fastcgi_index  index.php;
        #fastcgi_param  SCRIPT_FILENAME  /scripts$fastcgi_script_name;
        fastcgi_param SCRIPT_FILENAME $document_root$fastcgi_script_name;  #指定路径
        include        fastcgi_params;
    }
}
接着,重启nginx systemctl restart nginx
DokuWiki配置
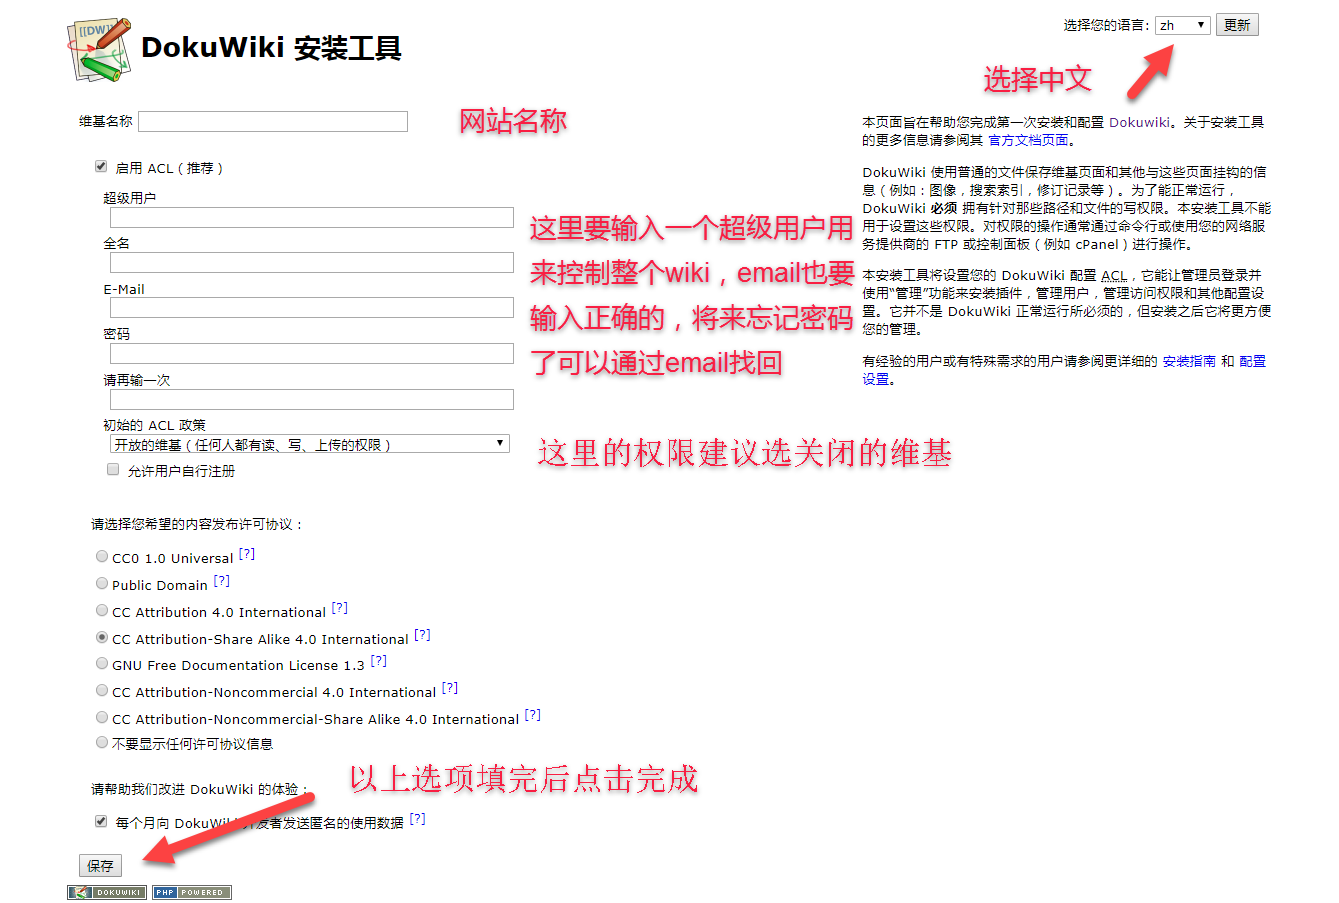
输入前面配置文件中的域名,前提是你的dns指向了当前机器的IP。
http://域名/install.php

nginx的再次配置
当我们安装完DokuWiki后,不能让别人再次访问install.php。所以要之前的配置文件改成:
server {
    listen 80;
    server_name wiki.example.com;## 这里需要修改成自己的域名
    # Maximum file upload size is 4MB - change accordingly if needed
    client_max_body_size 4M;
    client_body_buffer_size 128k;

    root /data/dokuwiki;## 这里填真正的wiki目录
    index doku.php;

    #Remember to comment the below out when you're installing, and uncomment it when done.
    location ~ /(data/|conf/|bin/|inc/|install.php) { deny all; }

#   Uncomment this prevents images being displayed !
#    location ~* \.(js|css|png|jpg|jpeg|gif|ico)$ {
#        expires 31536000s;
#        add_header Pragma "public";
#        add_header Cache-Control "max-age=31536000, public, must-revalidate, proxy-revalidate";
#        log_not_found off;
#    }

    location / { try_files $uri $uri/ @dokuwiki; }

    location @dokuwiki {
        # rewrites for userewrite=1
        rewrite ^/_media/(.*) /lib/exe/fetch.php?media=$1 last;
        rewrite ^/_detail/(.*) /lib/exe/detail.php?media=$1 last;
        rewrite ^/_export/([^/]+)/(.*) /doku.php?do=export_$1&id=$2 last;
        rewrite ^/(.*) /doku.php?id=$1&$args last;
    }

    location ~ \.php$ {
        #try_files $uri $uri/ /doku.php;
        fastcgi_pass   127.0.0.1:9000;
        fastcgi_index  index.php;
        #fastcgi_param  SCRIPT_FILENAME  /scripts$fastcgi_script_name;
        fastcgi_param SCRIPT_FILENAME $document_root$fastcgi_script_name;  #指定路径
        include        fastcgi_params;
    }
}
重启Nginx systemctl restart nginx
DokuWiki推荐扩展
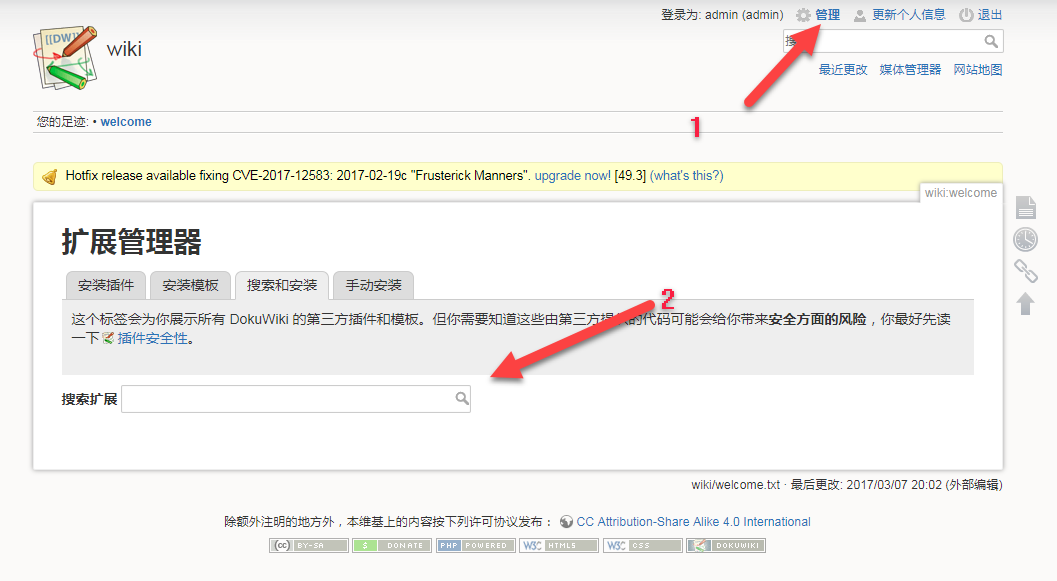
在管理页面可以看到扩展管理器。

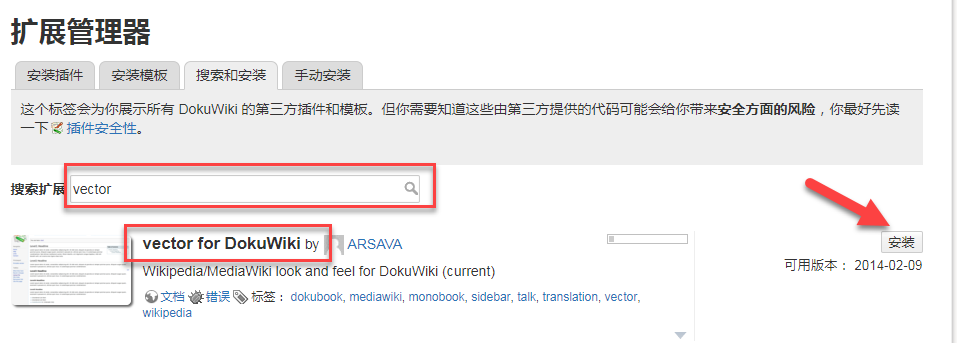
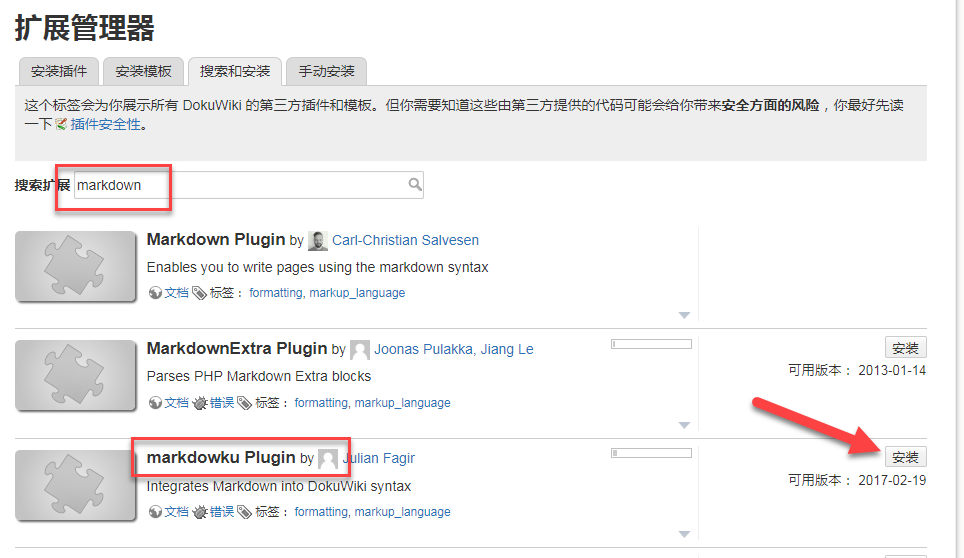
这里推荐两款扩展,分别是
vector,这是一款仿维基百科的主题。

markdownku,这是一个可以让你写markdown语法的插件。
